HKSAT Command-Line Interface provides following features.
Running analyses from a pre-existing HKSAT project in batches.
Producing the appropriate HKSAT project for CI/CD integration using information collected from both the code base and user inputs,
Generating Jenkins Pipeline scripts to automatically execute HKSAT analyses when the code base changes
To provide the features, HKSAT ships with the following batch files.
run.bat: Running analyses from a pre-existing HKSAT project in batches.
genOdinInfo.bat: Gathering necessary information for analysis from both the code base and user requirements.
genProject.bat: Creating a HKSAT project based on the collected information.
genScript.bat: Creating a Jenkins Pipeline script to integrate HKSAT with Jenkins CI/CD tool.
Basic Usage
Open the Windows Command Prompt.
Excute the relevant HKSAT batch file (i.e., run.bat, genOdinInfo.bat,
genProject.bat, genScript.bat) using the necessary parameters.
We recommend running the batch files in Administrator Mode.
Some functions might need write permissions to create or modify files in their
execution location.
Options
Each batch file has a range of options.
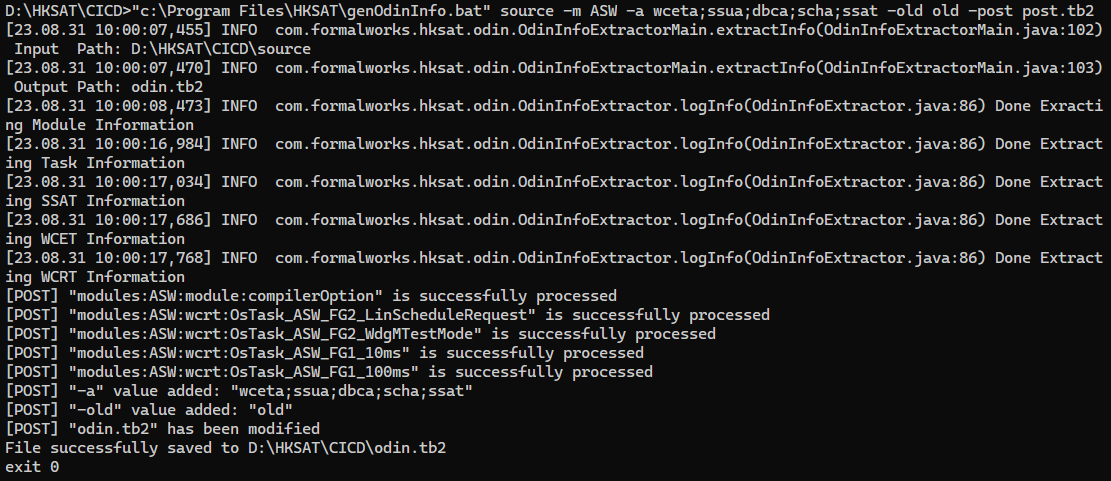
Options for ODIN/Mobilgene Analysis Information Gathering Feature (genOdinInfo.bat)
Options for ODIN/Mobilgene Analysis Information Gathering Feature
Options for Creating HKSAT Project Feature (genProject.bat)
Options for Creating HKSAT Project Feature
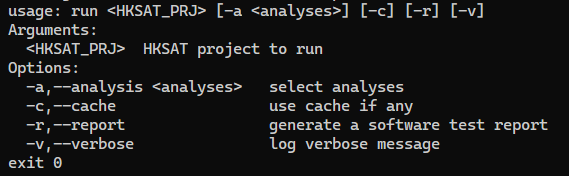
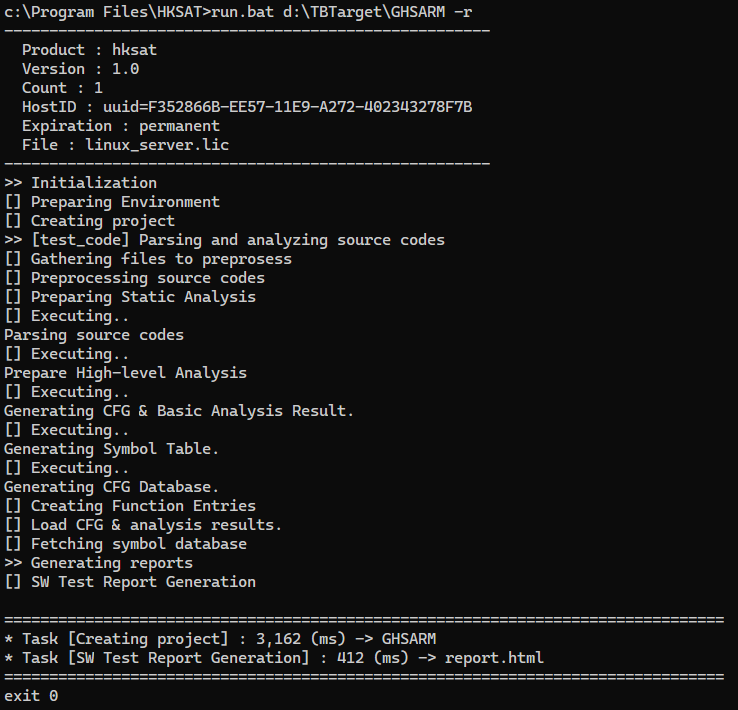
Options for Executing Pre-existing Analyses in Batches Feature (run.bat)
Options for Executing Pre-existing Analyses in Batches Feature
Options for Creating Jenkins Pipeline Script Feature (genScript.bat)
Options for Creating Jenkins Pipeline Script Feature
HKSAT_PRJ: Specifies the path to the desired HKSAT project folder.
-a,--analysis <analyses>: Specifies the names of the analyses to be
performed. If there are multiple analysis names, they are separated by a semicolon (;).
If this option is not present, the analysis will not run. If the option is present but
no analysis name is specified, all analyses in the project will be executed.
-r,--report: Generates a SW Test Report. The report will be created in the
location where contents.tb2 is located, with the name report.html
ODIN_PRJ_DIR: Specify the path to the Mobilgene project from which analysis
information will be extracted.
OUT_FILE: Specify the path that gathered information will be stored as a
file. If not specified, it will be created in the current folder as odin.tb2.
-m,--module <modules>: Specify the name of target software module
(i.e., ASW). If there are multiple, separate them with a semicolon (;). If the
option is not used, only the "ASW" module's information is extracted.
-a,--analysis <analyses>: Specify the desired analysis type.
If there are multiple types, separate them with a semicolon (;).
Supported analyses are "scha" (schedulability analysis), "wceta" (worst-case
execution time analysis), "ssua" (static stack usage analysis), "ssat"
(software static analysis), and "dbca" (duplicate block of code analysis).
Without this option, four analyses excluding schedulability analysis are selected.
If the option is present but no analysis type is specified, all five analyses are
selected.
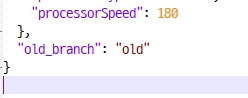
-old <old_branch>: If you want to perform a software change impact
analysis (SCIA), specify the branch name of the code repository where the previous
version is stored.
-post <edit_file>: If you wish to post-process the extracted
information, specify the post-processing file path. Modifications according to
the content of the post-processing file will be subsequently performed on the
generated odin.tb2 file. (Refer to section 2.2.1)
Sample Screenshot of Analysis Information Gathering Feature
When using the -m, --module option, module names that do not exist in the
Mobilgene project (i.e., -mASDF) are ignored.
The following essential files must exist in ODIN_PRJ_DIR.
You can specify the name of a file that contains post-processing contents to
automate repetitive editing tasks that might be additionally required for the
extracted analysis information.
If the extracted analysis information includes unnecessary source code and errors
occur when creating a module from the HKSAT project based on it
→ The post-processing function can be used to exclude unnecessary
source code.
If the extracted analysis information includes unnecessary compile options and
errors occur when performing analyses from the HKSAT project based on it
→ The post-processing function can be used to exclude unnecessary
compile options.
When you want to perform a Schedulability Analysis (SCHA)
→ The analysis information extracted by the HKSAT CLI requires users to
manually add some information necessary for the analysis. Therefore, with the
post-processing function, you can automate the completion of task information needed
for schedulability analysis.
The post-processing function operates by applying given post-processing content to
the extracted analysis information. The post-processing content is described in
JSON format as below, and it consists of 'delete' and 'add' sections. Here are the
tips for writing each section.
MODULE_NAME: Specifies the name of the target module selected
during the analysis information gathering phase.
OPTION1, OPTION2: Specifies the compiler options you want to delete from
the analysis information.
FILE1, FILE2: Specifies the source code paths you want to delete from
the analysis information.
FOLDER1, FOLDER2: Specifies the include folder paths you want to delete
from the analysis information.
KEY_VALUE1, KEY_VALUE2: Specifies the definitions (e.g., macros) you want
to delete from the analysis information in a key-value format. (The value is
not actually used.)
TASK1_NAME, TASK2_NAME: Specifies the task names for which you want to
add schedulability analysis information.
TASK1_INFO, TASK2_INFO: Specifies the schedulability analysis information
to be added (priority, wcet, period, deadline) in a key-value format.
The -post option only works when the -co option is used.
If you do not specify a post-processing file, or if the file does not
exist or is in a different format, it will be ignored.
A post-processing file template (edit.tb2) is provided in the "tools"
folder within the HKSAT installation directory.
Section "delete"
Using the "delete" section, users can automate the removal of unnecessary source
code or definitions from the analysis information (odin.tb2) that may
hinder the analysis.
The example below illustrates how to delete specific compile options, include folder
paths, and definitions associated with the "ASW" module from the analysis
information.
For definitions, they are written in a key-value format; however, only the key is
referenced for deletion, and the value is not used.
"c:\\" and "C:\\" are considered different. (case sensitive)
Section "add"
Using the "add" section, users can automate the process of supplementing the
analysis information (odin.tb2) with the required inputs for schedulability
analysis, such as priority, wcet, period, and deadline.
The example below illustrates how to supplement the schedulability analysis
information for the task named "OsTask_ASW_FG2_LinScheduleRequest" related
to the "ASW" module in the given analysis information.
If the analysis information already contains the same key (priority, wcet,
period, deadline) with one in the add section, the value will be overwritten.
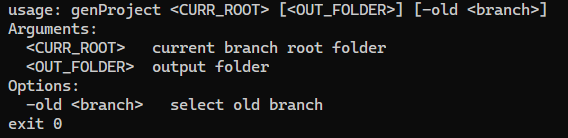
Creating HKSAT Project Feature
The usage of creating HKSAT project feature is as follows:
CUR_ROOT: Specify the path where the source code under analysis and
the analysis information file are located.
OUT_FOLDER: If you want to save the created HKSAT project in a
specific directory, specify that desired location. If not provided, the
project will be saved in the current folder with the filename contents.tb2.
-old <old_branch>: If you wish to perform a change impact
analysis, specify the folder where the prior version of the source code
under analysis is stored. Without this specification, the change impact
analysis will not be included in the created project.
Sample Screenshot of Creating HKSAT Project Feature
Creating Jenkins Pipeline Script Feature
This feature creates a Jenkins project script for HKSAT's CI/CD integration.
Running the feature will ask you to sequentially input the Git repository address,
the branch to be analyzed, login details, and a notification email. A script will
then be generated based on the provided information.
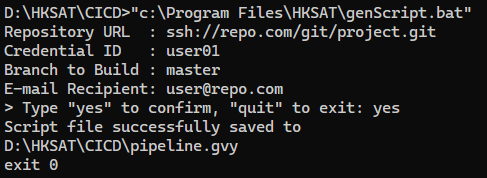
⟩ genScript.bat [OUT_FILE]
OUT_FILE: If you wish to save the generated Pipeline script to a specific
path, specify that path. If not specified, the 'pipeline.gvy' file will be created
in the current execution location.
Sample Screenshot of Generating Jenkins Pipeline Script Feature
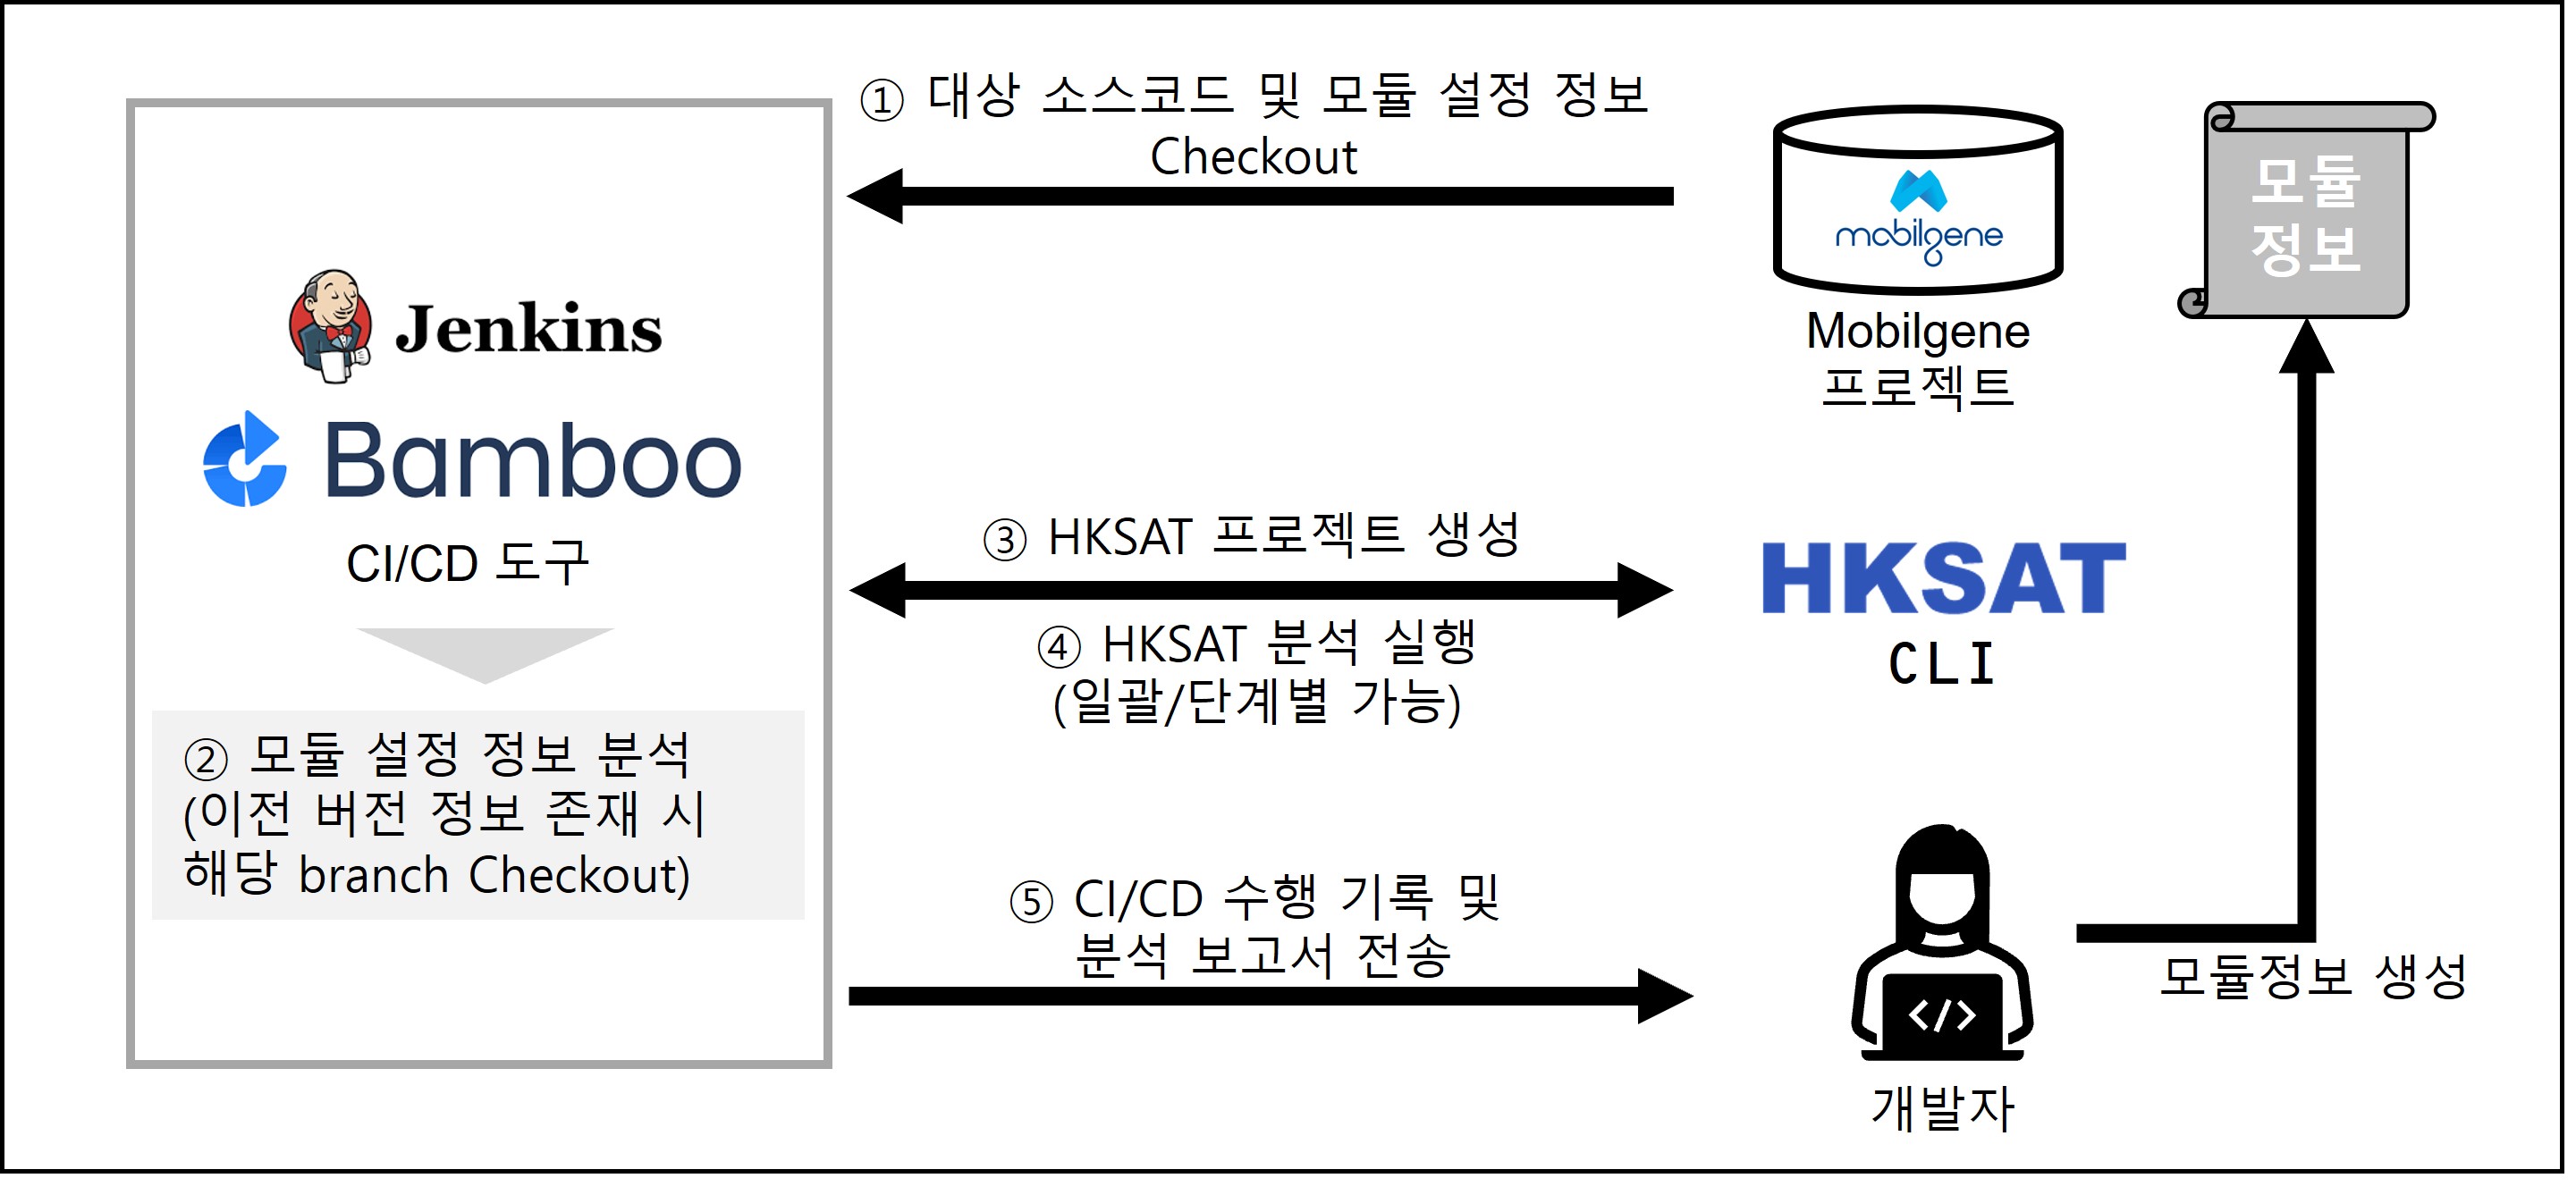
The generated Jenkins Pipeline script performs four functions sequentially:
It fetches the source code and the analysis information file from Git.
It creates an HKSAT project using the source code and the analysis information file.
It executes the HKSAT analysis and generates a SW Test Report.
It sends the logs and the SW Test Report to the developer.
Retrieving Source Code and Analysis Information File
Initially, the script utilizes the repository information provided by the user
during the Jenkins Pipeline script generation phase to fetch the target source
code and the accompanying analysis information file (either odin.tb2 or
hksat.tb2).
Subsequently, the script analyzes the information file. If the user has provided
details for software change impact analysis (like the name of the repository
branch where the previous version of the target is stored), the script will also
fetch that source code as well.
    // Fetching source code from GIT repository
    stage('checkout'){
        steps{
            // Clean-up
            cleanWs()

            // Fetching the latest source code of the target
            bat "mkdir ${curr}"
            dir("${curr}") {
                checkout scmGit(
                    branches: [[name: "*/${curr}"]],
                    extensions: [],
                    userRemoteConfigs: [[credentialsId: "${cid}", url: "${repo}"]])
            }

            // Fetching the previous version of the module if needed
            script {
                old = getOldBranch("${curr}")
                if (old != null){
                    bat "mkdir ${old}"
                    dir("${old}"){
                        checkout scmGit(
                            branches: [[name: "*/${old}"]],
                            extensions: [],
                            userRemoteConfigs: [[credentialsId: "${cid}", url: "${repo}"]])
                    }
                }
            }
        }
    }
curr: The branch name in the code repository where the latest version
of the target module is stored.
old: The branch name in the code repository where the previous version
of the target module is stored.
cid: Access ID for the code repository.
repo: Address or URL of the code repository.
Creating HKSAT Project
Using the fetched source code and the anlaysis information file, the script executes
the HKSAT CLI's function to create an HKSAT project
(refer to Section 2.3).
If previous version information was provided in the prior step for software change
impact analysis, this analysis will be added into the HKSAT project.
    // Creating HKSAT Project
    stage('project'){
        steps {
            bat "mkdir ${target}"

            // Add SCIA if needed
            script{

                if (old != null){
                    bat """"${hksat}" -cc ${curr} ${target} -old ${old}"""
                } else {
                    bat """"${hksat}" -cc ${curr} ${target}"""
                }
            }
        }
    }
curr: The folder name where the latest version of the target module is
stored.
old: The folder name where the previous version of the target module is
stored.
target: The folder name where the generated HKSAT project file will be saved.
Executing HKSAT Analysis and Generating SW Test Report
The script executes the analysis defined in the generated HKSAT project
and outputs the SW Test Report.
    // Executing analysis and generating SW Test Report
    stage('analysis') {
        steps {
            script {
                batExit = bat returnStatus: true,
                script: """"${hksat}" ${target} -a -r"""
                echo "batExit = " + batExit
                if (batExit != 0){
                    catchError(buildResult: 'SUCCESS', stageResult: 'FAILURE') {
                        error "An error occurred during the analysis."
                    }
                }
            }
        }
    }
hksat: Path where HKSAT is installed.
target: Folder name where the generated HKSAT project is stored.
Sending Logs and SW Test Report Function
The script sends an email to the designated email address, attaching the SW Test
Report generated in the previous step as well as the Jenkins log.
The email subject and content indicate whether the analysis was successful or not.
Below is an example of an email in the event of a successful analysis.
SUCCESS: Job 'hksat_cicd_git_server [66]':
Check console output at "hksat_cicd_git_server [66]"
    // Sending email
    stage('report') {
        steps {
            script {
                // Configuring the email subject based on analysis result.
                if (batExit == 0){
                    result = "SUCCESS"
                }

                emailext (
                    // Subject
                    subject: "${result}: Job '${env.JOB_NAME} [${env.BUILD_NUMBER}]'",

                    // Body
                    body: """<p>${result}: Job '${env.JOB_NAME} [${env.BUILD_NUMBER}]':</p>
                    [<p>Check console output at ...],

                    // Recipients
                    to: "${mailto}",
                    recipientProviders: [developers(), requestor()],

                    // Attachments
                    attachLog: true,                            // Jenkins 콘솔로그 첨부
                    attachmentsPattern: 'target/report.html',   // HKSAT 분석 보고서 첨부
                )
            }
        }
    }
mailto: Email address that are specified during the creation of the Jenkins
Pipeline script.
In this tutorial, we will cover how to create an HKSAT-Jenkins integration
project that uses the HKSAT CLI feature to automatically perform HKSAT analysis
and notify the developer of the results via email.
Overview of HKAST-Jenkins Workflow (KR)
The HKSAT-Jenkins integration project introduced in this tutorial requires the
following prerequisites
Tutorial Prerequisites
Category
Requirements
Software
Jenkins
HKSAT (with license and compatible compilers)
Git
Test editor
Hardware
Windows PC with all the necessary software pre-installed
Compiler USB dongle (if needed)
Etc.
Git repository location of target module
Jenkins user's credential ID
Task information for schedulability analysis (priority, WCET, deadline, period)
Additional information required for compiling the target source code (if necessary)/td>
Ensure the "Pipeline Utility Steps" plugin is installed in Jenkins.
(Refer to the FAQ)
The "Extended E-mail Notification" feature must be configured in Jenkins.
(See the FAQ for details)
This tutorial assumes the following for simplicity:
The HKSAT installation folder is included in the Path environment variable.
(Refer to the FAQ)
The target source code is stored (i.e., cloned from git) in C:\Project.
The latest version of the target source code is stored in the
"master" branch of the Git repository, while the previous version is saved
in the "old" branch.
Step 1: Gathering Analysis Information
Once the analysis information extraction is performed initially,
it doesn't need to be repeated unless there are changes to the analysis
target configuration (i.e., the list of source codes) or the analysis
configuration.
In this step, you'll create an analysis information file (either odin.tb2 or
hksat.tb2) based on the target source code and user requirements. There are two
methods to achieve this: either by utilizing the HKSAT Command-Line Interface
(CLI) or by using the HKSAT Graphical User Interface (GUI).
Using HKSAT CLI
If your analysis target is ODIN/Mobilgene, the HKSAT CLI can be utilized to extract
information for all analyses supported by HKSAT.
To extract analysis information, run the HKSAT CLI in the Windows Command Line
(cmd.exe). The following command is an example for generating analysis information
for the ASW module of the target Mobilgene project, specifically for longest
execution time analysis, stack usage analysis, static software analysis, and
duplicate code analysis. The resulting information will be saved in odin.tb2.
⟩ genOdinInfo.bat C:\Project
To extract analysis information for modules other than ASW, use the "-m"
option. For example, to target the BSW module, you would use "-m BSW".
If you wish to include schedulability analysis, utilize the "-a" option.
An example command would be "-a scha;wceta;ssua;ssat;dbca". In most
situations, to complete some task information, it might be necessary to
use the "-post" option alongside.
For extracting analysis information related to software change impact
analysis, employ the "-old" option.
Using HKSAT GUI
Regardless of whether the target is an ODIN/Mobilgene project, users can utilize
the HKSAT GUI to configure the analysis settings. After setting up, you can select
the desired analysis kind and save it as an analysis information file. For detailed
guidance, please refer to "Project Management", in the Help section.
Creating a Project: Use the HKSAT GUI to create a new HKSAT project.
Project Configuration: Set up the project by adding the desired analysis
target modules and analysis types.
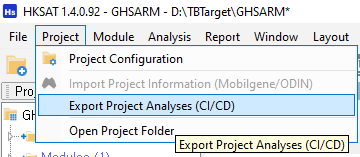
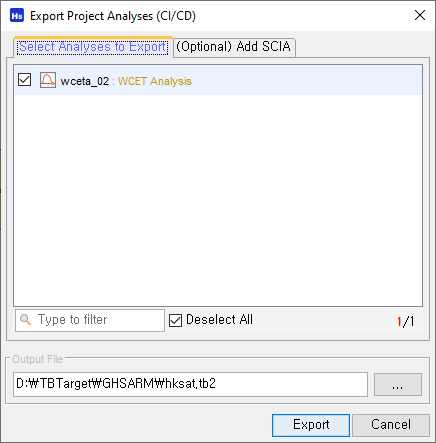
Generating Analysis Information: Navigate to the top menu bar in HKSAT,
and select "Project" → "Export Project Analyses (CI/CD)" (refer to the
illustration below). From here, choose the analysis you want to perform with
the CI/CD tools. Select where you want to save the analysis information file
(i.e., hksat.tb2), then click "Export". If you wish to add a software change
impact analysis, navigate to "Add SCIA" tab and enter the branch name where
the previous version of the source code is stored.
Location of Export Project Analyses Menu ItemSelect AnalysesAdd SCIA
Step 2: Uploading Analysis Information File
This step involves uploading the extracted analysis information (either odin.tb2
or hksat.tb2) to the source code repository (e.g., Git). The uploaded analysis
information file will later be utilized by the HKSAT CLI's project creation feature.
Copy the analysis information file to the target source code directory, for
instance, C:\Project.
Use Git commands to upload the analysis information file to the source code
repository. Below is an example Git command for uploading the odin.tb2 file:
When there are changes in the source code, such as additions or deletions
of directories/files or modifications in compile options/macros, it's
crucial to update the analysis information file accordingly.
Step 3: Creation of HKSAT-Jenkins Integration Project
This section guides you through the steps to create a Jenkins project for
executing HKSAT.
Login to Jenkins.
Jenkins Login Page
From the Jenkins Dashboard, select "New Item".
Adding New Jenkins Project
Choose the "Pipeline" project type, input your desired project name, then click
on "OK".
Setting Project Type and Name
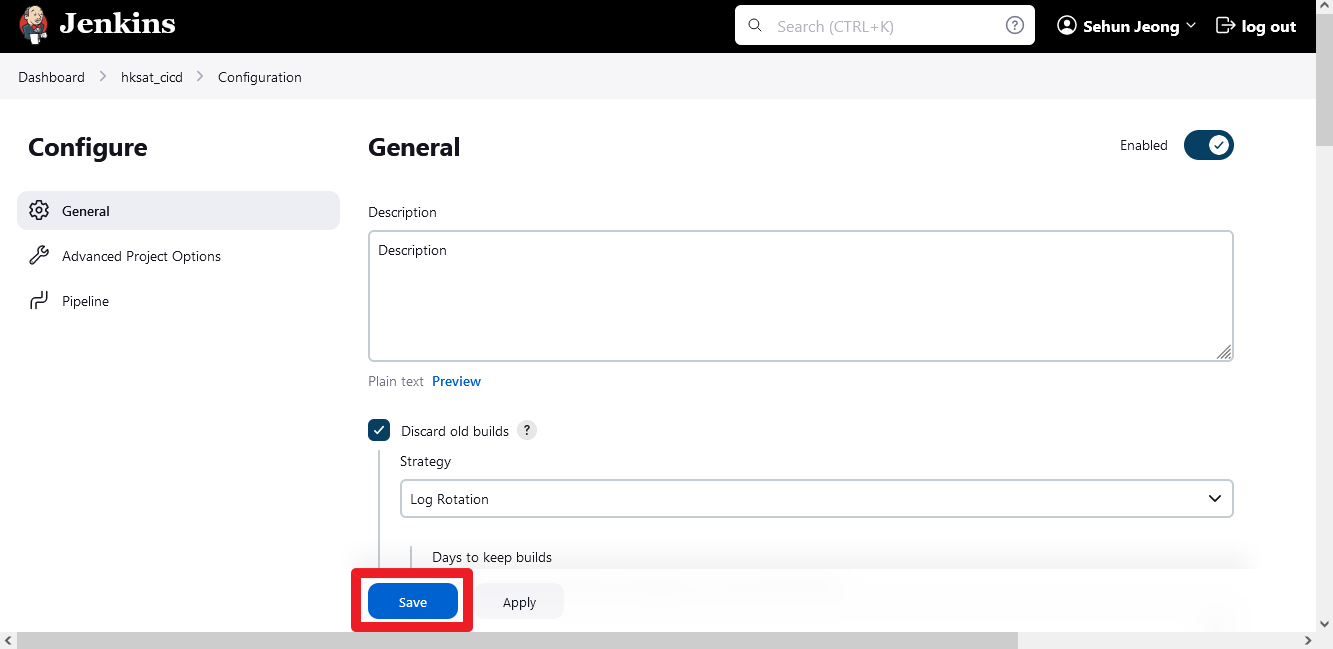
Configure the project by adding a description, setting up build triggers,
and making any other necessary adjustments. Once done, click on "Save".
Configuring Project
To prevent issues arising from HKSAT license conflicts, it is recommended
to enable the "Do not allow concurrent builds" setting in Jenkins. This
ensures that only one build runs at a time, thus avoiding potential license
conflicts.
For a seamless integration with HKSAT, it's imperative that you avoid
using spaces or special characters in your Jenkins project names.
Incorporating such characters can lead to errors during HKSAT analysis.
Step 4: Generating Jenkins Pipeline Script for HKSAT-Jenkins Integration Project
The heart of the HKSAT-Jenkins integration project lies in the creation of the
Pipeline script. Refer to Section 2.4 for
detailed guidance. Below, we illustrate how to generate a Pipeline script
named "pipeline.gvy" in the specified execution location.
⟩ genScript.bat
Running the batch file will ask you to sequentially input the Git repository
address, the branch to be analyzed, login details, and a notification email.
A script will then be generated based on the provided information.
Sample Screenshot of Jenkins Script Generation
For the email addresses, you can specify multiple recipients by separating
each address with a semicolon (;).
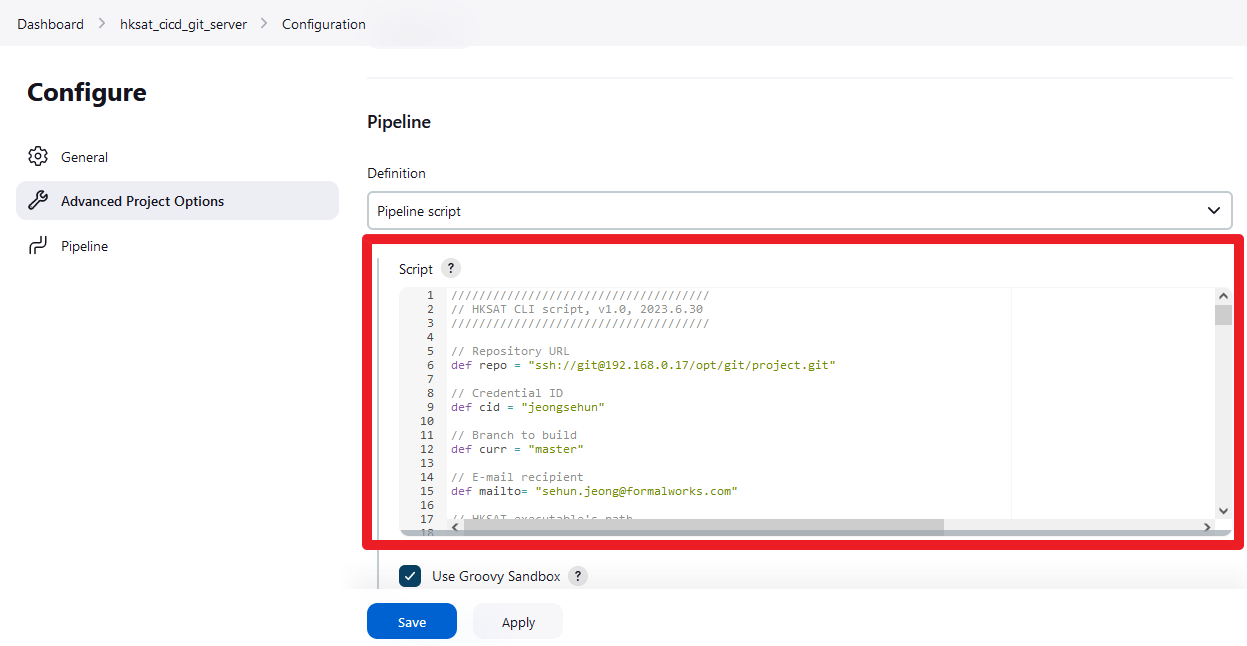
After crafting your script, open it with a text editor of your choice. Select
the entire script content and copy it. Then, navigate to the settings interface
of the previously set up HKSAT-Jenkins integration project. Locate the
"Pipeline" section and paste the copied script content there.
Screenshot of Pipeline Script Configuration Section
For security purposes, it's highly recommended to ensure that the script being
configured was produced using the HKSAT CLI's generation feature.
Step 5: Running HKSAT-Jenkins Integration Project
Using the completed project, execute automated HKSAT analyses and reports
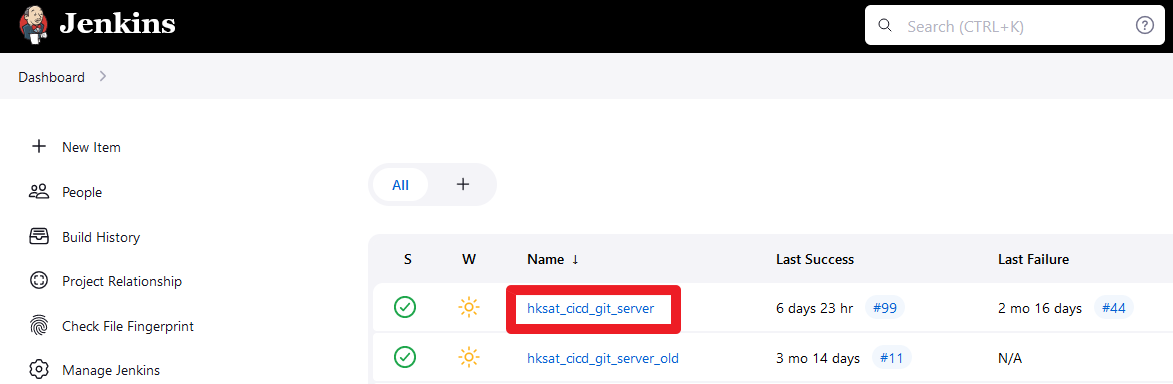
Open the HKSAT-Jenkins integration project page.
Selecting the created project from the Jenkins dashboard screen
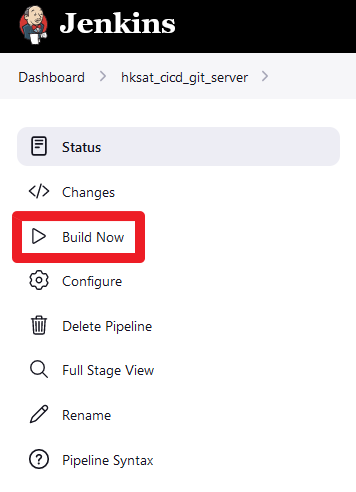
Select "Build Now" from the left-hand menu.
Selecting "Build Now" button from the project page
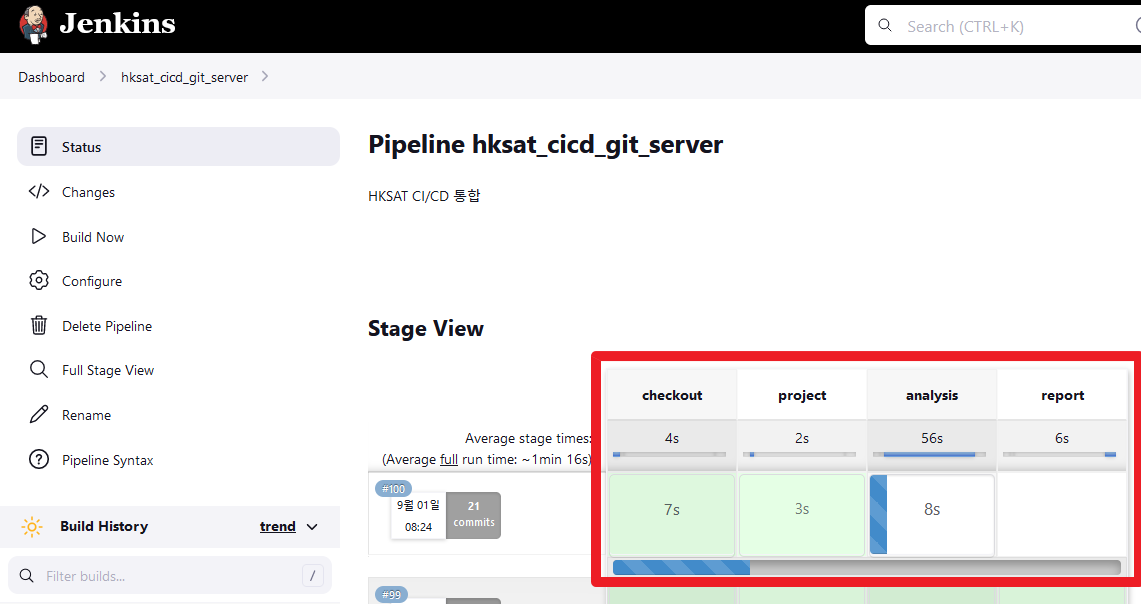
In the central Stage View, observe the creation of a new build item (denoted
as "#number"), and verify that each step is executed correctly by the Pipeline
script.
HKSAT executing step by step following the Pipeline script
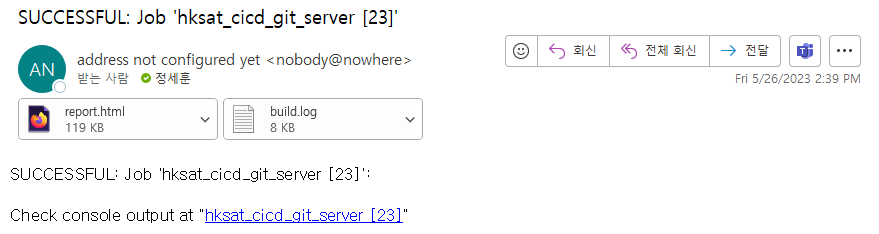
Check your email to ensure you've received the analysis results log and attached
HKSAT SW Test Report.
Email with attached analysis result log and HKSAT SW Test Report
We have compiled answers to potential questions that may arise when setting up
the HKSAT Jenkins project.
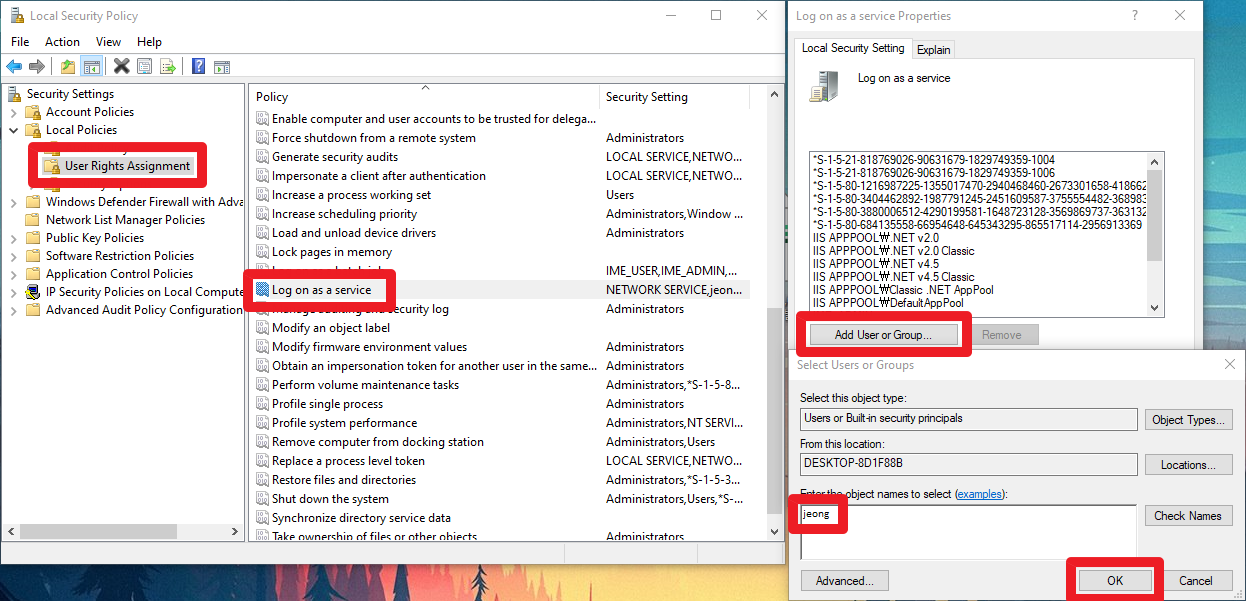
How should I set the Logon Type during Jenkins installation?
To properly use the HKSAT-Jenkins integration feature, you need to set the Logon Type
to "Run service as local or domain user". Here are solutions to some possible
errors you might encounter during this process:
When selecting "Test Credentials", you encounter the "This account
either does not have the privilege to logon as a service" error:
Go to "Control Panel" → "Administrative Tools" →
"Local Security Policy" on your Windows machine.
On the left panel of "Local Security Policy", navigate to
"Local Policies" → "User Rights Assignment".
On the right panel, select "Log on as a service".
In the "Log on as a service properties" window, choose
"Add User or Group…".
In the "Select User or Group" window, input your current
Windows login account ID and click "OK".
Example Setting of Local Security Policy
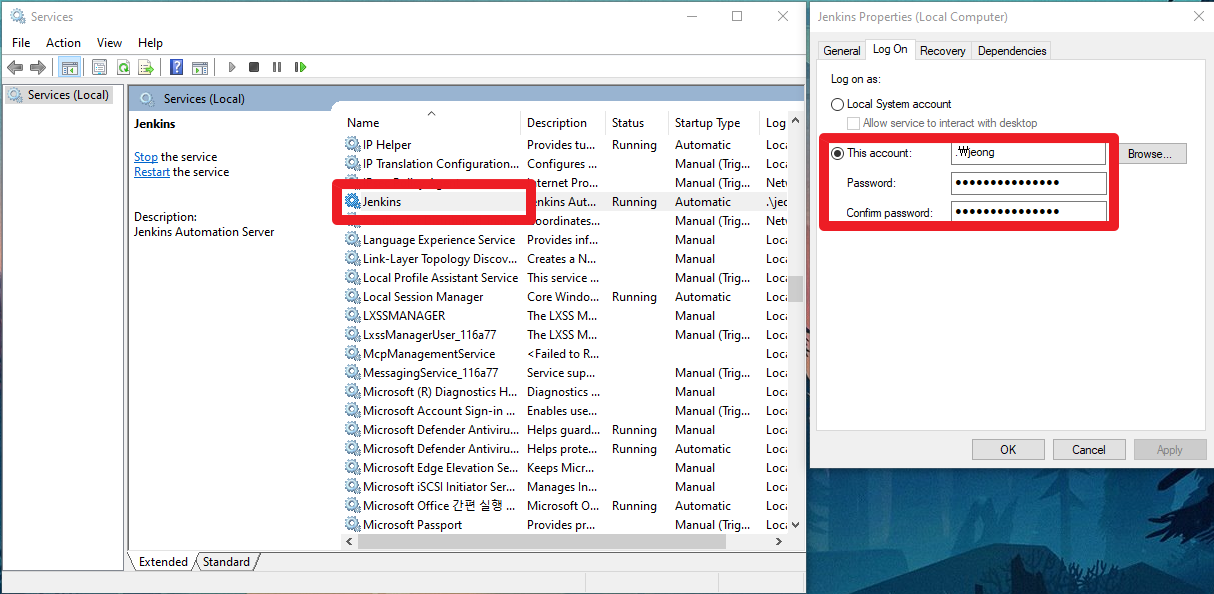
"Jenkins failed to start - Verify that you have sufficient privilege
to start system services" 오류
Delete all folders and files where Jenkins is installed.
Begin the installation process by selecting the Jenkins
installation file.
If the "Jenkins failed to start…" error appears, do not close
the installation. Instead, open the Windows services screen.
(Run "services.msc" in the Windows command prompt.)
In the "Services" list, find "Jenkins". The start type will be
"Automatic" and the status will be blank.
Open the properties of the "Jenkins" service and navigate to the
"Log On" tab.
Clear the contents of "This account", "Password", and "Confirm
password". Re-enter the correct details and click "Apply".
Go back to the Jenkins installation and retry the installation
process.
Example Setting of Jenkins Service
Do I have to generate the analysis information file every time?
You only need to generate the analysis information file once, provided there are
no changes in the configuration of the target source code (source code list,
header file list), compilation options, or the type of analysis to be performed
with HKSAT.
Who receives the analysis result emails?
Three main categories of users will receive the analysis result emails:
The developer who changed the target source code
The Jenkins user who initiated the HKSAT Jenkins project (e.g.,
selected "Build Now")
Email addresses specified when creating the Jenkins Pipeline script
The change impact analysis is not executing.
If the change impact analysis is not being performed, you should check the
created odin.tb2 or hksat.tb2 file.
The branch name where the previous version of the source code is stored must
be present in either odin.tb2 or hksat.tb2.
Example Configuration for Running Software Change Impact Analysis
I modified the analysis information (odin.tb2), but it is not reflected in the
results.
If both odin.tb2 and hksat.tb2 exist in the target source code folder,
hksat.tb2 is applied first, so changes in odin.tb2 won't be reflected.
Therefore, only the necessary tb2 file should be present in the target
source code folder.
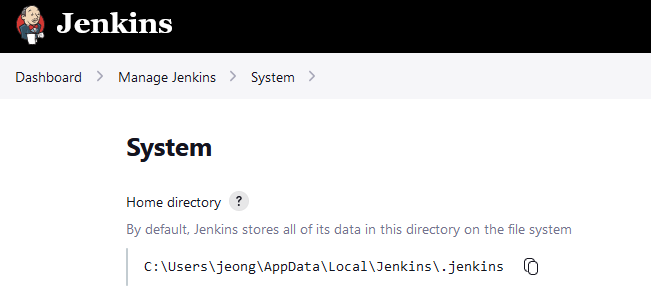
Where does Jenkins store the target source code it downloaded?
Jenkins creates a folder for each project in the workspace folder of its home
directory and stores relevant files there. You can check the location of the
Jenkins directory folder on the "Manage Jenkins" page.
Jenkins Home Directory
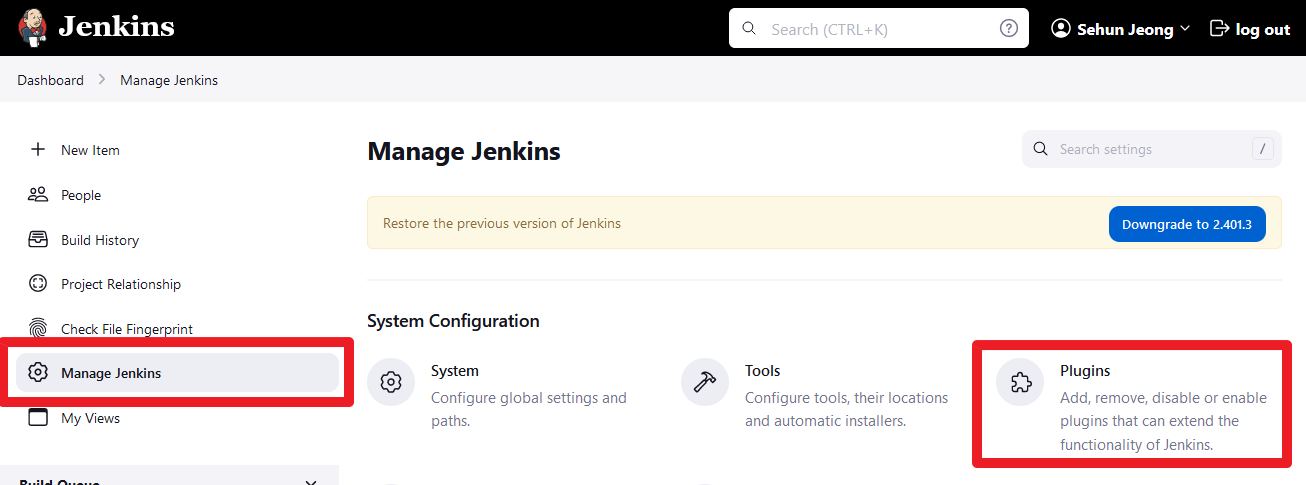
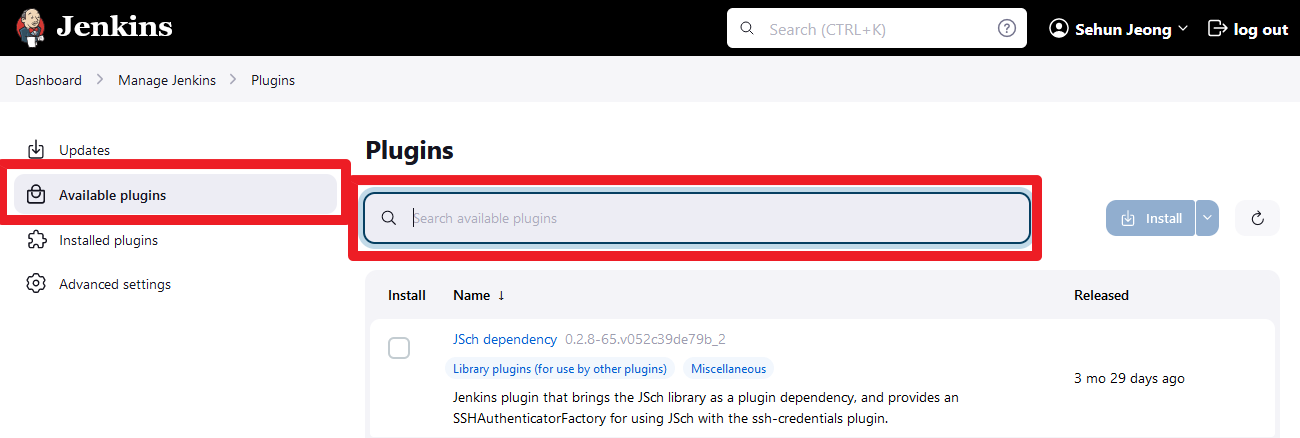
How do I install Jenkins plugins?
To install Jenkins plugins, follow these steps:
Click on "Manage Jenkins" → "Plugins".
Click "Available plugins" and search for the desired plugin.
Install the found plugin and, if necessary, reboot the Jenkins server.
"Plugins" Menu Item in the "Manage Jenkins" PagePlugin Search Screen
How do I add the HKSAT installation folder to the Path environment variable?
To easily call the HKSAT CLI, add the HKSAT installation folder to the Path environment
variable using these steps:
Open the Windows Run dialog (Windows key + r) and type
"SystemPropertiesAdvanced".
Click the "Environment Variables" button in the "Advanced" tab.
Find the "Path" variable in the "System variables" list and
double-click it.
Click "New" and input the HKSAT installation path (e.g.,
"C:\Program Files\HKSAT").
After rebooting or logging out/in, the new environment variable
will take effect.
How do I set up email in Jenkins?
To set up email in Jenkins, follow these steps:
Click "System" on the "Manage Jenkins" page.
Find the "Extended E-mail Notification" section
Configure the "SMTP server" and "SMTP Port" according to your email
server.
What additional preparations related to HKSAT are needed for the
integration?
For the tasks described above, the following preparations are required.
Additional Preparations
Task
Installation and Configuration of HKSAT
HKSAT License
Installation of Compilers
Step 1-1. Gathering Analysis Information (CLI)
Required
-
-
Step 1-2. Gathering Analysis Information (GUI)
Required
Required
Required
Step 2. Uploading Analysis Information File
-
-
-
Step 3. Creation of HKSAT-Jenkins Integration Project